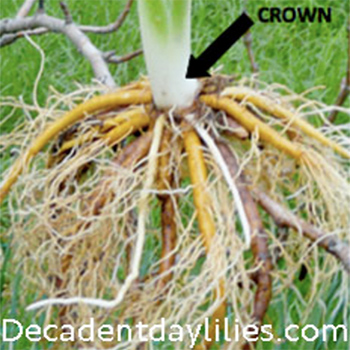
Transplant daylilies is an important exercise as it plays a critical role in allowing daylilies to grow strong and healthy. Often times, your garden will grow dense with clogged up clumps that end up competing for nutrients. The process of separating and transplanting daylilies also helps to spread the excess plants to areas they wouldn’t reach, naturally. It is a simple and a cost effective way to multiply daylilies in your garden. But just like any other practice in daylily farming there are several important steps you have to take when dividing and transplanting daylilies.
When do you Divide and Transplant Daylilies?
The best time to divide and transplant daylilies is early autumn after the hot summer or early spring before flowering. Although they are able to withstand different weather conditions and climates in Australia, it is highly recommended that the best time to move them is from spring to autumn. Gardeners see no real danger in transplanting daylilies throughout other times of the year, dividing and transplanting daylilies provides quality results when this is done either in spring or autumn. At this time, the soil temperature is rather moderate, allowing new transplanted daylilies to grow quickly.
When will Daylilies Bloom after Transplanting
Daylilies that are transplanted in early summer and autumn will definitely bloom the following season. But when transplanted during winter and spring they are not likely to bloom until the following year, while transplanting daylilies in bloom is not recommended this can be too much stress on the plant. When you move your plants in early autumn, they’ll require at least five weeks prior to frost to adapt to their new environment.
How do you Divide Daylilies
Transplanting daylilies involves moving and dividing daylily clumps into several plants that can be replanted for easier multiplication. When the clumps become too thick and large, they produce weak flowers that will eventually die. To dig and divide is not an option it’s mandatory, the process of dividing and transplanting daylilies is quite simple if you follow these necessary steps.
- Dig the Daylilies from the Ground, to begin with, uproot the clump by digging the root ball out of the ground with a garden fork and shake off the excess soil.
- Dividing the Daylilies – Use the same garden fork and knife to divide the clump into several sections, this should be done at least every three years and make sure each section has enough roots to accelerate its establishment. Each section of the clump should have at least one good fan to help it re-establish itself, by having more fans to the clump this will give you an instant display of flowers at flowering time.
Organic Growing Tips while Transplanting Daylilies
Transplant the Daylilies any time when they are actively growing, gardeners choose to transplant their plants in early spring or late summer in Australia. Once you have uprooted them, it is best to prepare a fresh new garden bed.
How Close to Plant Daylilies – Prepare Garden Soil – Re-Planting Daylilies
- You need to till all the soil properly and remove all the weeds.
- PLANT DAYLILIES so the daylily crown makes good contact with the mound of dirt built in the hole, spread roots over the mound and just cover the roots by 2cm or 1 inch of soil do not plant daylilies too deep.
- SPACE DAYLILIES as close as 18 to 30 inches apart, not as far apart for small, miniature and dwarf they can be planted a few inches closer.
- FEED DAYLILIES by adding in any real organic homemade fertiliser, homemade compost mix will make an excellent organic soil conditioner with some blood and bone fertiliser mixed well with your existing garden soil, this will make certain your plants get fed well for months.
- WATER DAYLILIES after transplanting daylilies water daylilies in well, to remove any air pockets around the soil and the roots this will help stop transplant shock as well. Do not over water, water daylilies only when they dry out this is very important when transplanting daylilies into pots or their new spot in the garden.
- MULCH DAYLILIES apply mulch once the daylily has grown a complete new set of leaves, it is best to keep the mulch away from the stem of the daylily plant otherwise rot can set in.
Organic gardening helps you to grow great plants. Normally, all varieties do better in deep moist soils, it is very important that the garden bed is well drained. Putting at least two inches of organic compost, organic manures mixed in the soil can go a long way in making sure your plants grow strong and healthy. When you buy them it is best that the plants are clean and healthy before replanting them. It is important that you replant your daylilies as soon as possible and don’t leave them out of the ground for too long. With these good growing conditions, the beauty of transplanting your plants will provide you with more flowers to beautify your home and garden.

